
PVE8.0中常见问题解决办法(更新中)
编辑PVE8.0中常见问题解决办法(更新中)
pve去除订阅弹窗
1、每次登录PVE会提示订阅弹窗,依次输入下面命令可以去除弹窗。
sed -Ezi.bak "s/(Ext.Msg.show\(\{\s+title: gettext\('No valid sub)/orig_cmd\(\); void\(\{ \/\/\1/g" /usr/share/javascript/proxmox-widget-toolkit/proxmoxlib.js

systemctl restart pveproxy.service
更换镜像源
1、软件源文件 sources.list 的每一行都定义了一个软件源,最常用的软件源一般放在前面。在 sources.list 中,空行会被忽略,字符#及以后的内容会被解析为注释。可以用 apt-get update 命令获取软件源中的软件包信息,在安装或更新 系统的时候,使用官方自带源因为官方源在国外的缘故,速度慢且失败的概率高,几百兆的更新速度只有几十k甚至几K的情况。
国内网络大环境的情况下建议使用中科大、清华、阿里和网易的国内源,速度快,可以节省更新所占用的时间。这里以Proxmox VE(Proxmox Virtual Environment)PVE 6.3系统演示为例。
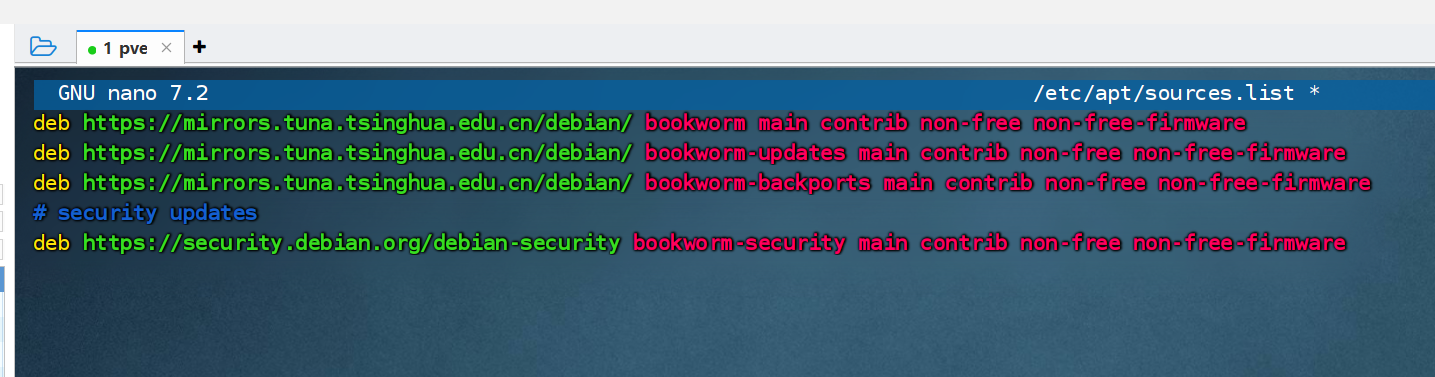
2、输入 nano /etc/apt/sources.list编辑软件源文件,将默认的源文件使用##注释掉,然后添加清华源。
# 清华源
deb https://mirrors.tuna.tsinghua.edu.cn/debian/ bookworm main contrib non-free non-free-firmware
deb https://mirrors.tuna.tsinghua.edu.cn/debian/ bookworm-updates main contrib non-free non-free-firmware
deb https://mirrors.tuna.tsinghua.edu.cn/debian/ bookworm-backports main contrib non-free non-free-firmware
# security updates
deb https://security.debian.org/debian-security bookworm-security main contrib non-free non-free-firmware
去除PVE 企业版更新源
1、PVE企业源面是面向企业的软件源(对比常规版本会更稳定,并且会在有软件更新时发出邮件通知),但是企业源需要提供订阅密钥才可以使用,个人用户用不到,直接删除或者注释掉即可,避免系统发出错误提示信息。
2、输入nano /etc/apt/sources.list.d/pve-enterprise.list编辑企业源,在前面加入## 即可屏蔽企业源。

Ceph源修改
1、输入 nano /etc/apt/sources.list.d/ceph.list 命令,编辑修Ceph软件包仓库位置的配置文件。
##deb https://enterprise.proxmox.com/debian/ceph-quincy bookworm enterprise
deb https://mirrors.tuna.tsinghua.edu.cn/debian/ceph-nautilus buster main

5、执行更新。
apt-get update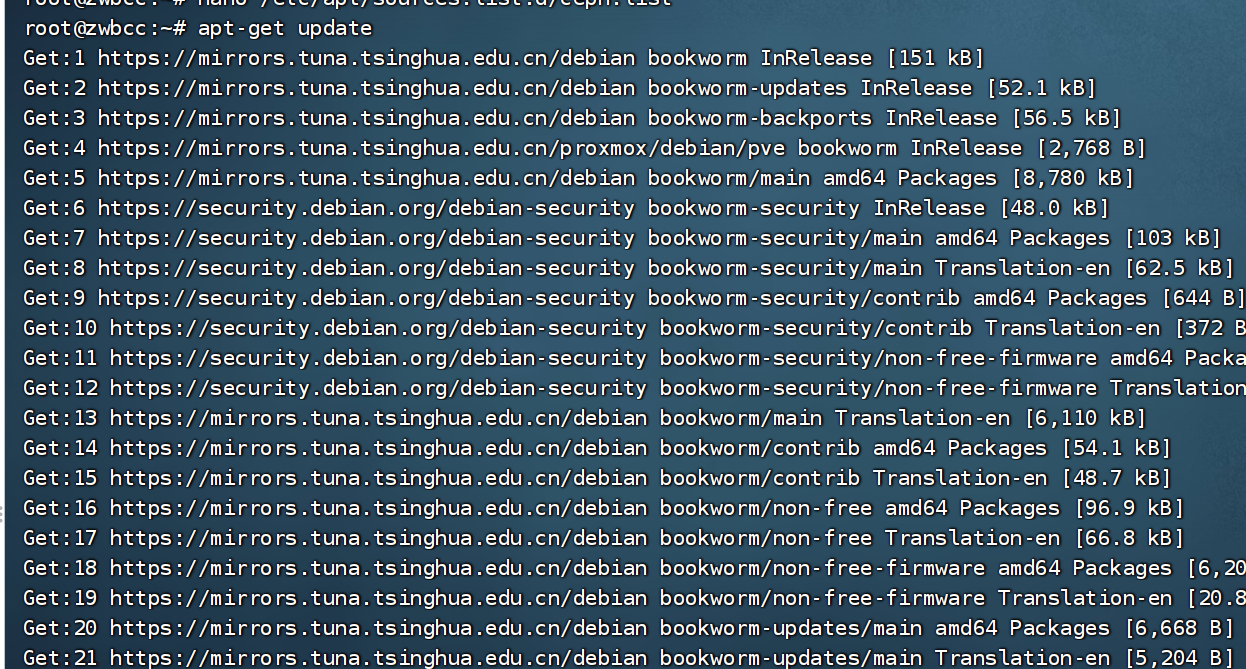
6、在更新列表中检查已经是最新版本。
PCI硬件直通
1、根据平台输入开启硬件直通命令。
INTEL:
GRUB_CMDLINE_LINUX_DEFAULT="quiet intel_iommu=on iommu=pt"AMD:
GRUB_CMDLINE_LINUX_DEFAULT="quiet amd_iommu=on iommu=pt"2、保存以后更新 grub。
update-grub3、加入 vfio 模块。
echo "vfio" > /etc/modules
echo "vfio_iommu_type1s" >> /etc/modules
echo "vfio_pci" >> /etc/modules
echo "vfio_virqfd" >> /etc/modules

update-initramfs -k all -u
4、输入reboot重启机器。
升级内核
1、更新仓库索引。
apt update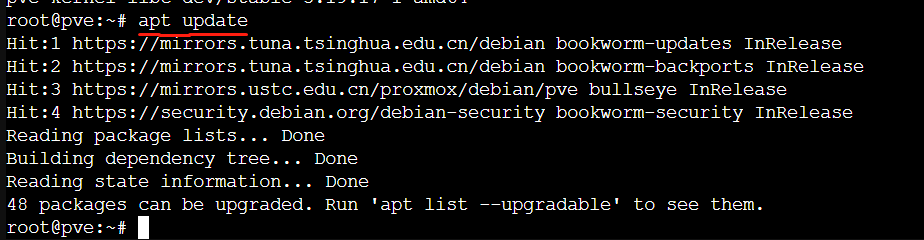
2、使用下面的命令,可以查看可以安装的内核。
apt search pve-kernel|grep pve-kernel-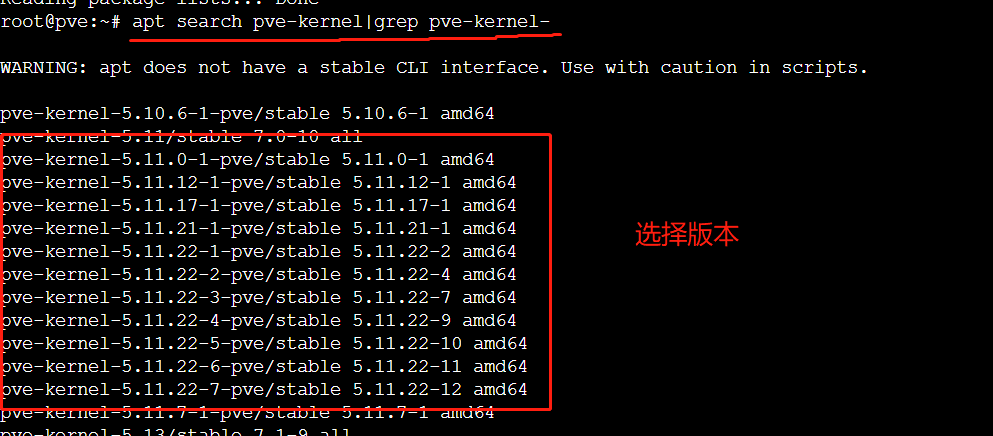 3、选择内核版本进行更新(-kernel-5.19.7-2-pve/stable 5.19.7-2 amd64为内核版本)。
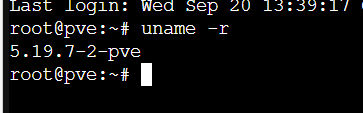
apt install pve-kernel-5.19.7-2-pve/stable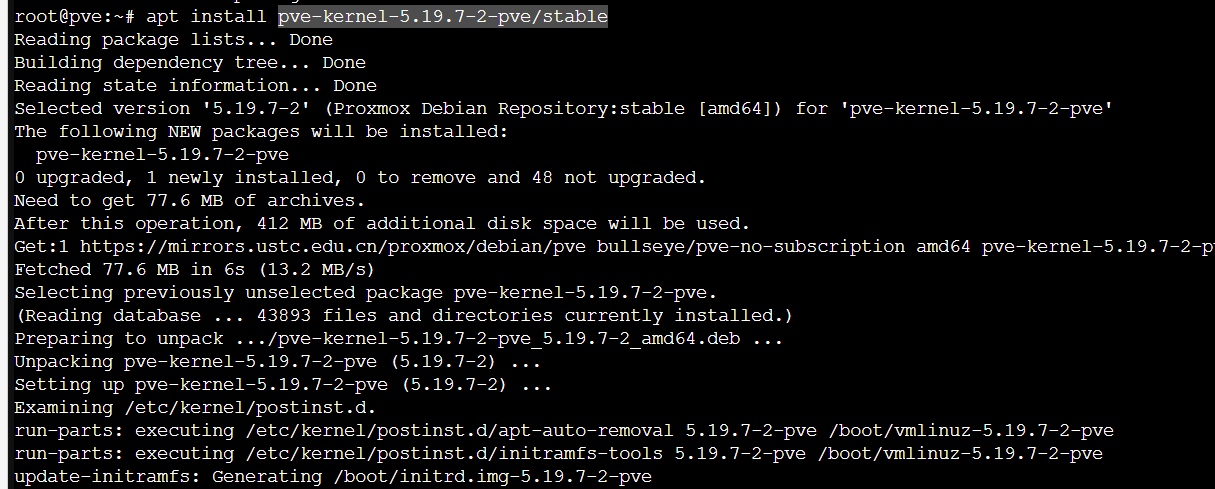 4、更新成功。
pve电源调度策略
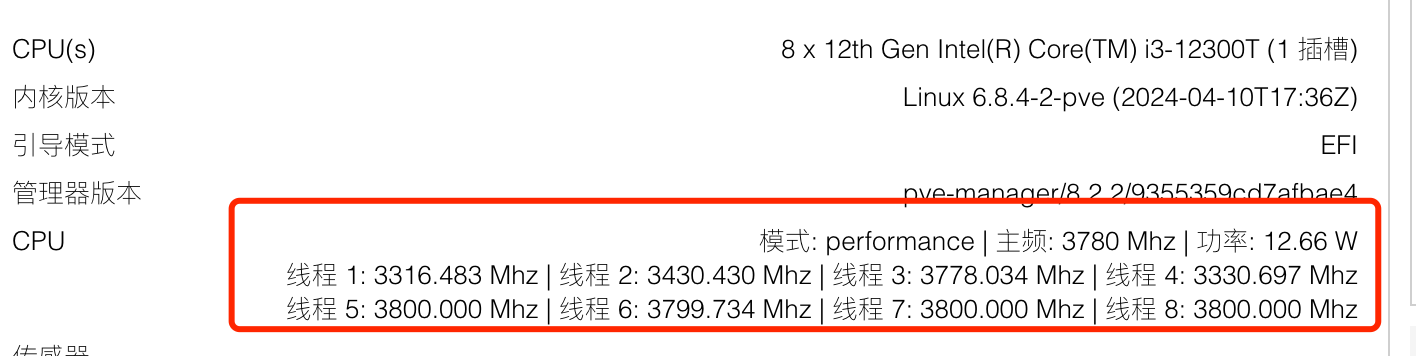
1、pve默认的电源调度策略是性能模式(performance),可以看到现在的功耗有12w左右。
2、首先安装linux-cpupower等工具。
apt update && apt install linux-cpupower powertop -y3、输入下面命令调整为全核省电模式(powersave)。
cpupower frequency-set -g powersave
4、策略设置模式。
# 全核高性能
cpupower frequency-set -g performance# 全核省电
cpupower frequency-set -g powersave# 0-16 开启高性能
cpupower -c 0-15 frequency-set -g performancePVE 中 lxc 容器往 NFS 存储备份的问题解决
在 PVE 中 CT 的应用非常常见,部署方便快捷,而且非常轻便。所以在日常工作中使用得比较多,为了数据和应用环境的安全,计划用 PVE 内置的备份功能进行备份。
在 PVE 上加载了一个 NFS 的 nas,容量比较大,所以把备份目的设备在 nas 上。但在启动的时候总是报错:
ERROR: Backup of VM 100 failed - command '...' failed: exit code 2按在网上查到的信息,大致原因是 vzdump 进行备份的时候会把 /tmp 当临时中转的目录,不过这个目录的权限有些问题,无法让 10000 以上的用户写入,所以会导致失败。
知道原因后,解决问题就比较简单了,直接改 vzdump 的配置文件,重新指定一个用于备份中转的 tmp 目录:
cat /etc/vzdump.conf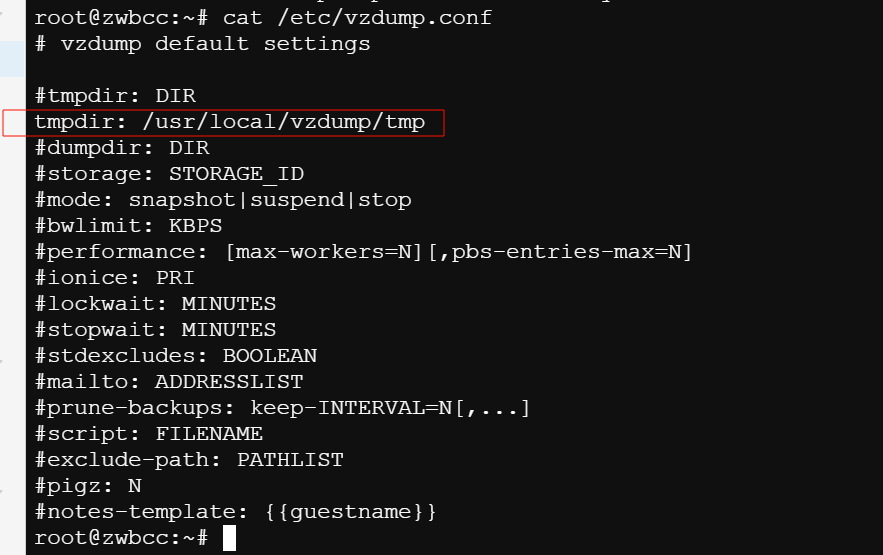
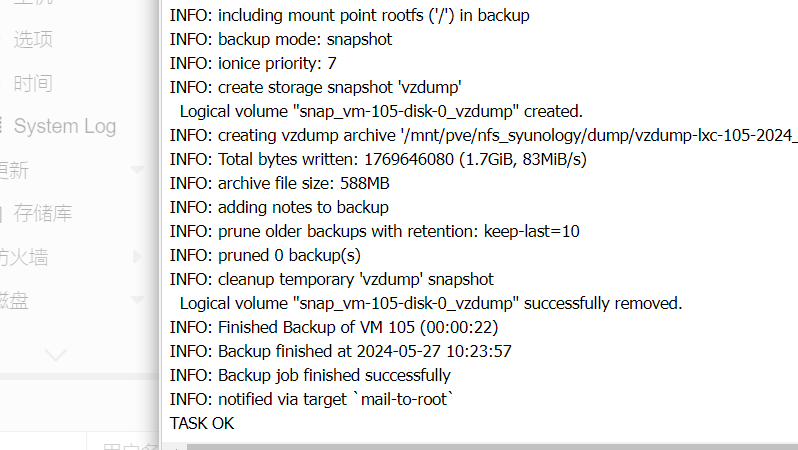
问题解决:
pve修改管理地址ip
1、使用下面命令修改pve管理地址的ip和网关。
nano /etc/network/interfaces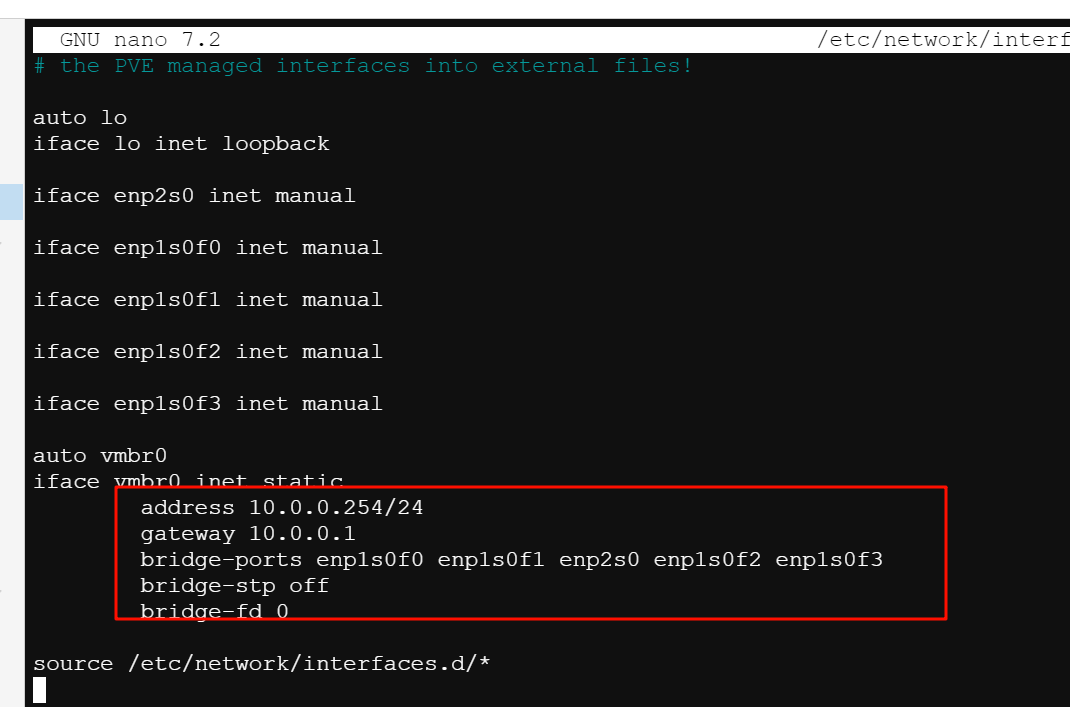
2、使用下面命令修改pve的开机提示ip。
nano /etc/issue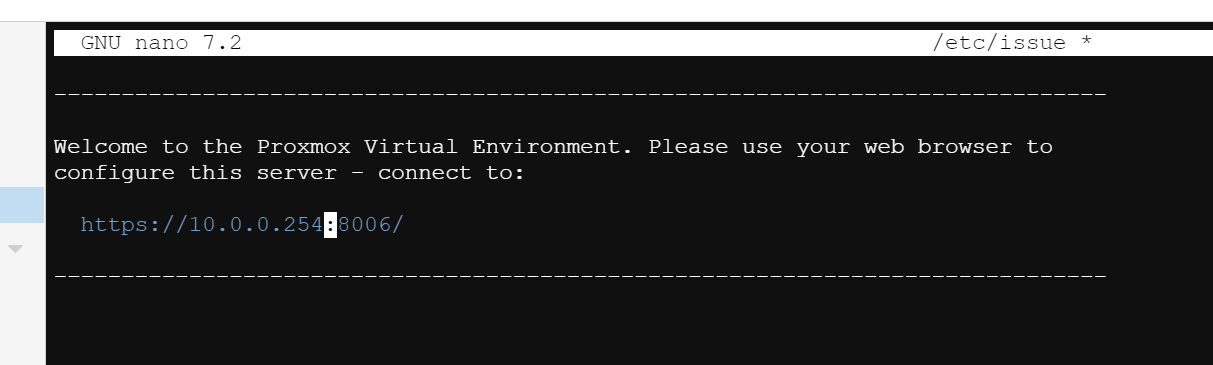
- 0
-
分享